The AppSumo Guide to Email Outreach – Step 3: Ensuring High Deliverability
In this article, we’re doubling down on what it takes to improve email deliverability. After all, if your email doesn’t reach its intended audience, what’s the point?
Level up your digital marketing with our best tips for freelancers and agencies. Download Now
Email outreach is equal parts art and science. But many agency owners and entrepreneurs get intimidated by one side or the other. (But, like, objectively: How many Keanu Reeves gifs is too many for a cold email?)
That’s why we decided to enlist the mind and tactics of email-marketing veteran Guillaume Moubeche to help you understand the best practices for getting stellar email open rates.
Guillaume is the CEO and cofounder of Lemlist, an email outreach tool trusted by thousands of business owners. If anyone knows about open rates, it’s him.
In this article, we’re doubling down on what it takes to improve email deliverability. After all, if your email doesn’t reach its intended audience, what’s the point?
Open rate expectations
Before we dive into the tactics, it’s helpful to set a standard to compare your results against. Guillaume says that if you’re cold-emailing correctly, you should expect a 50% open rate or greater.
It is important to send cold emails in a personalized manner that follows technical rules so you spark interest and avoid the spam folder. If you’re consistently getting less than 50% open rates, return to this article to see where you can improve.
Also, according to Guillaume, email timing matters less than most people think. It’s not like social media, where algorithms might hide your content depending on when you post. Most people check all their latest emails, no matter when they came in.
In addition, many of the pointers in this article have to do with sending messages directly through email servers (like Gmail), not newsletter tools like MailChimp. Some of these best practices are different for newsletter building.
With that out of the way, let’s see some of these tactics.
Scale your email sending efforts carefully
Let’s say you’re starting your email outreach efforts from scratch using your personal or business email. Guillaume mentions that to ensure high email deliverability, you must warm your domain.
Email servers are designed to separate quality emails from spam. They use several algorithms to determine how each email should be categorized. One of the many factors email servers consider is the trustworthiness of the domain an email is coming from.
You have a sender reputation.
If your server is used to you sending 10-15 emails per day. A sudden dispatch of 500+ emails will send a red flag and may cause your email deliverability to go way down.
To avoid this, deliberately scale your email outreach over months. Start by sending 5-10 per day. Then send 15-25 for a while, then 30-40, and eventually you can scale to 50-100. The gradual scaling can drastically improve deliverability.
Digital ID cards
It’s smart to scale to avoid sending red flags. But you should also take a technical precaution that tells email servers you’re not a spammer. Specifically: set up an SPF & DKIM. These are essentially ID cards for an online domain. They tell email servers that a specific email address is actually associated with a specific domain.
SPF and DKIMs basically tell email servers that you’re a real person.
If you’re the DIY type, we’re going to walk you through how you can set all this stuff up depending on how you’re rigged for outbound email. Let’s first go over some definitions..
SPF – Sender Policy Framework
A DNS record which lets mail recipients know which mail servers can send email from your domain.
DKIM – DomainKeys Identified Mail
DKIM prevents spoofing, which is when an email is changed to appear as if it came from a different server than it was actually sent. To keep someone from sending unauthorized email looking like it came from your domain, DKIM adds an encrypted signature to the message.
DMARC – Domain-Based Message Authentication, Reporting & Conformance
DMARC is another protection against spoofing by authenticating the domain a message is sent from.
SPF, DKIM, and DMARC work together as separate layers of authentication for email from your domain. The best way to ensure deliverability for your domain is to implement all three of these.
How To Enable SPF for your domain (any mail system)
1. In the DNS manager for your domain, create a TXT record.
2. Set the following fields:
- Name (host or alias): Leave blank. Some DNS managers such as GoDaddy will not allow you to leave this blank. In this case, enter @.
- Time to Live (TTL): Leave at the default or enter 3600.
- Value (answer or destination): Choose the appropriate option for your system
- For G Suite enter v=spf1 include:_spf.google.com ~all
- For MS Office 365 enter v=spf1 include:spf.protection.outlook.com -all
- For other email systems, you may rely on the mail servers publicly listed in your domain: v=spf1 include: mx a ~all
- DNS records may take up to 48 hours to propagate fully
How to Setup DKIM for your Domain (G Suite)
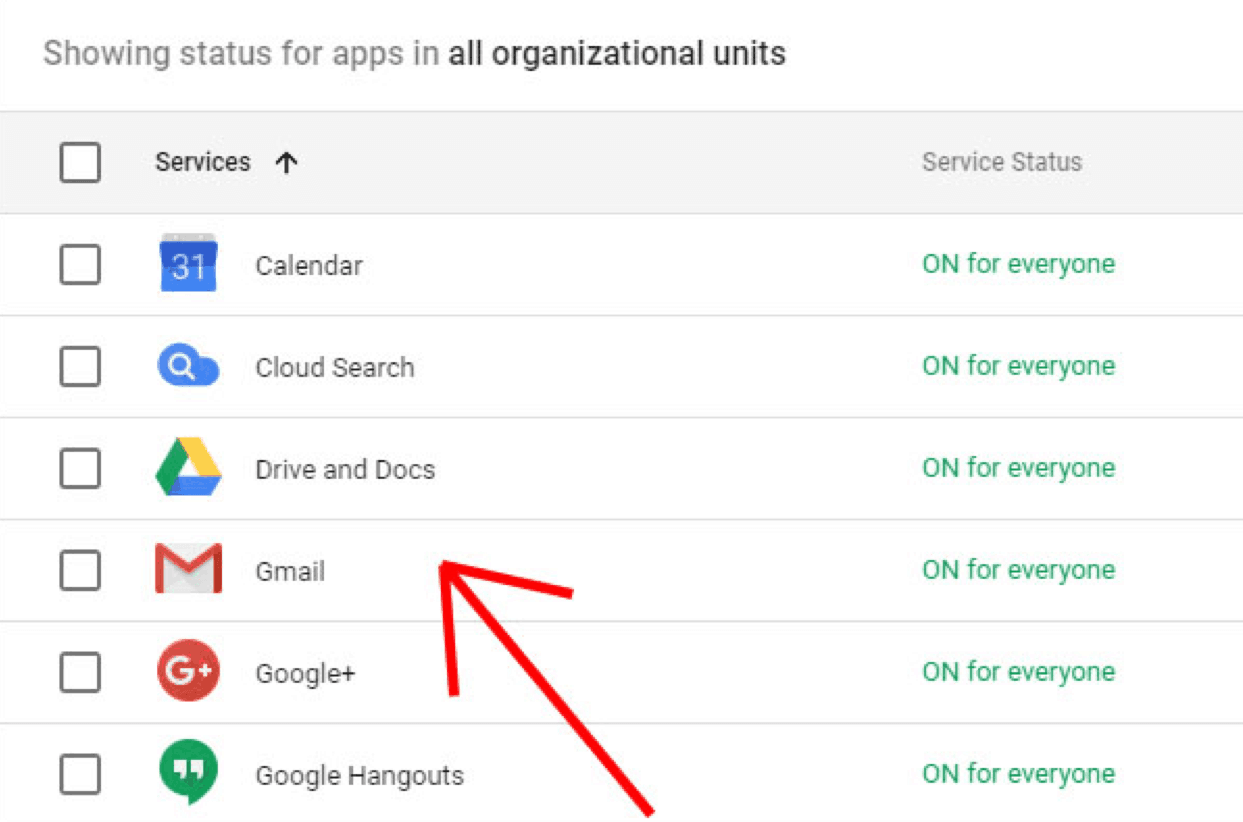
1. From the Google Admin console, go to ‘Apps’.
2. Select ‘G Suite’.
3. Select ‘Gmail’.
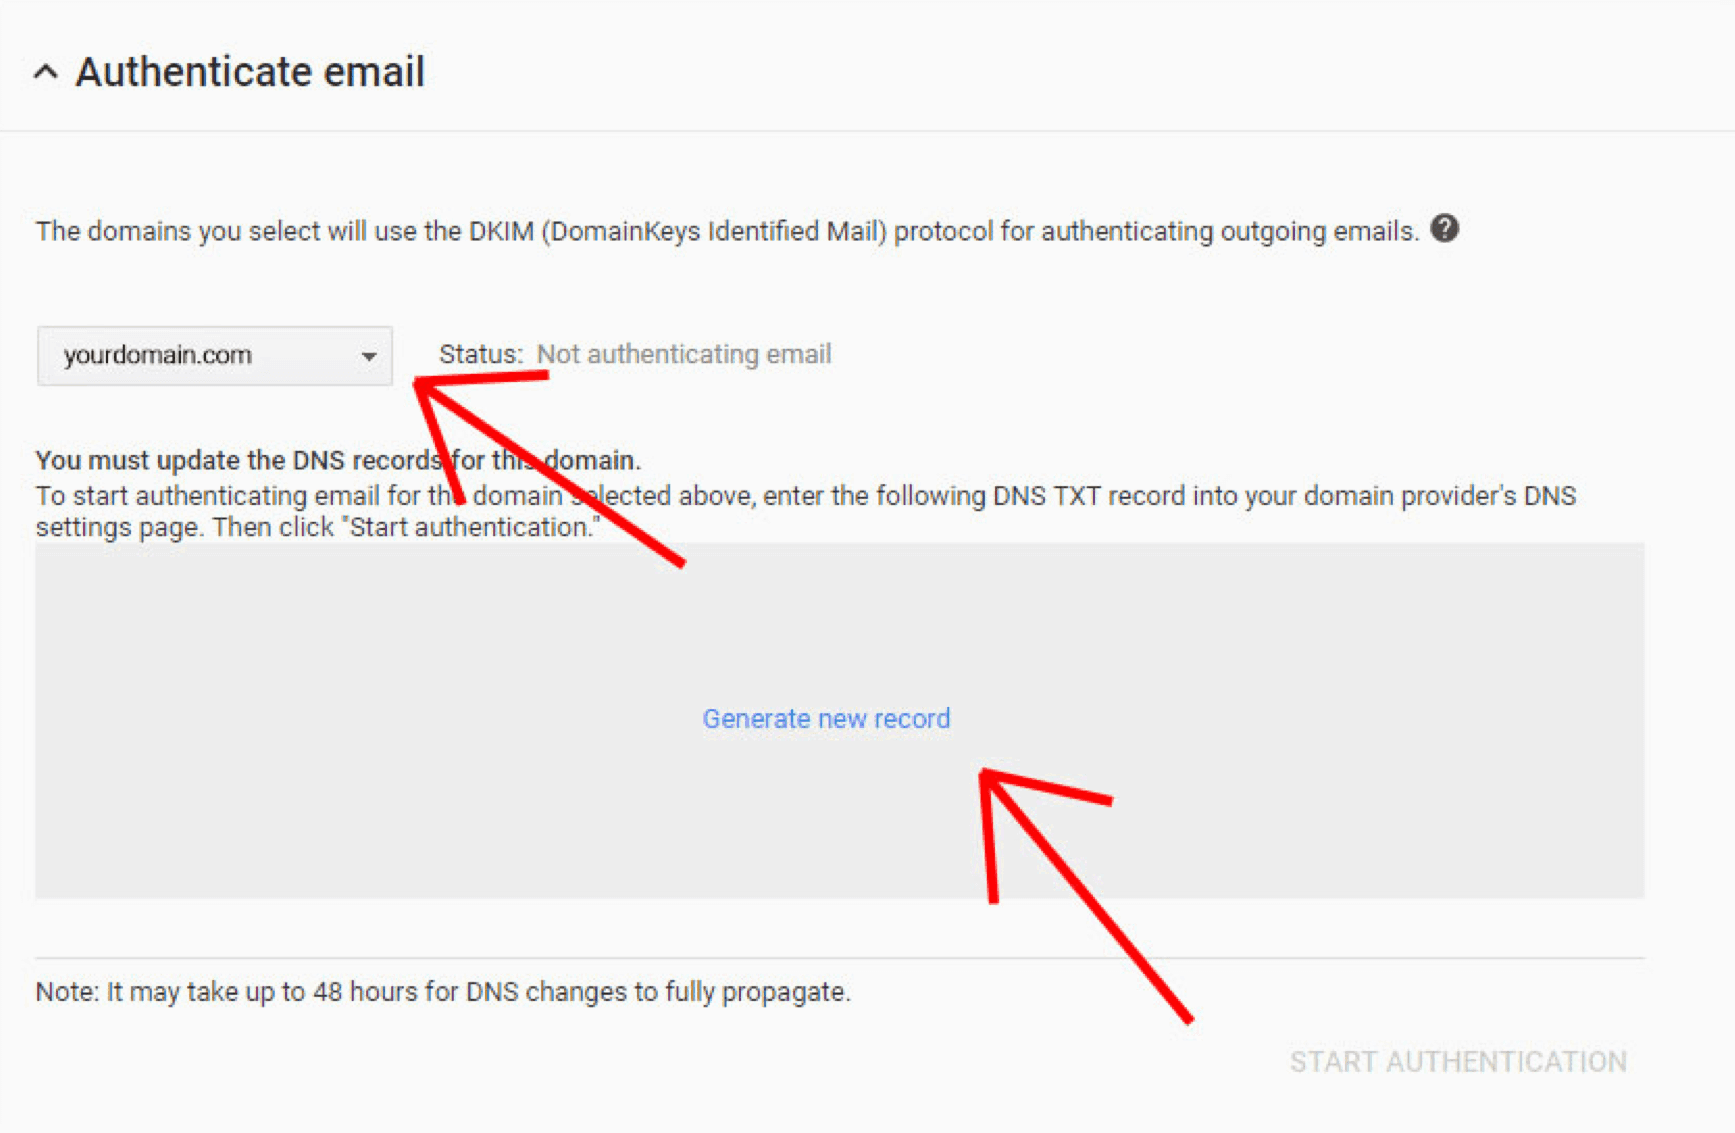
4. Click ‘Authenticate Email’.
5. Select the proper domain, then click ‘Generate Key’.
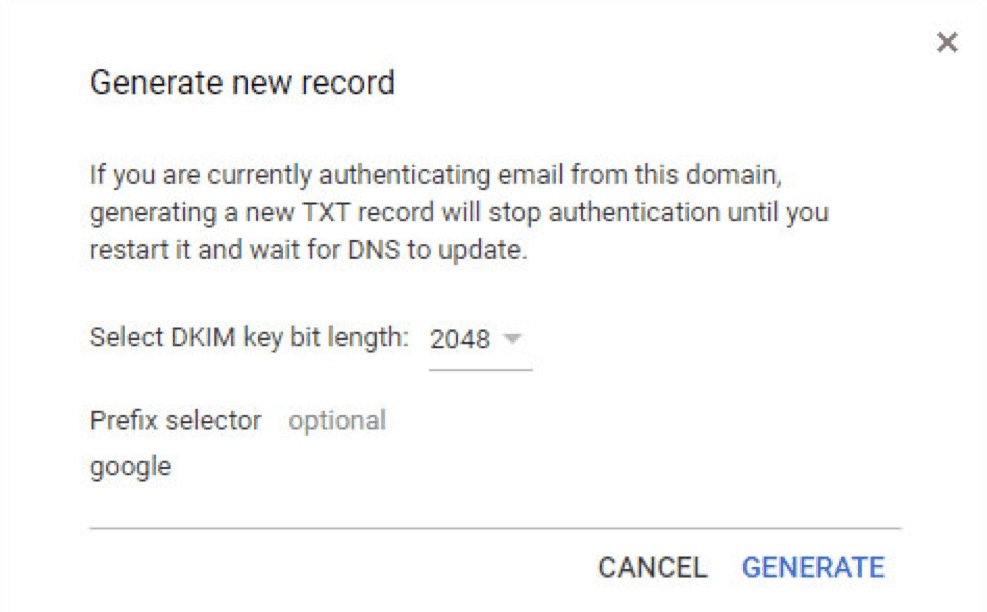
6. Click ‘Generate’.
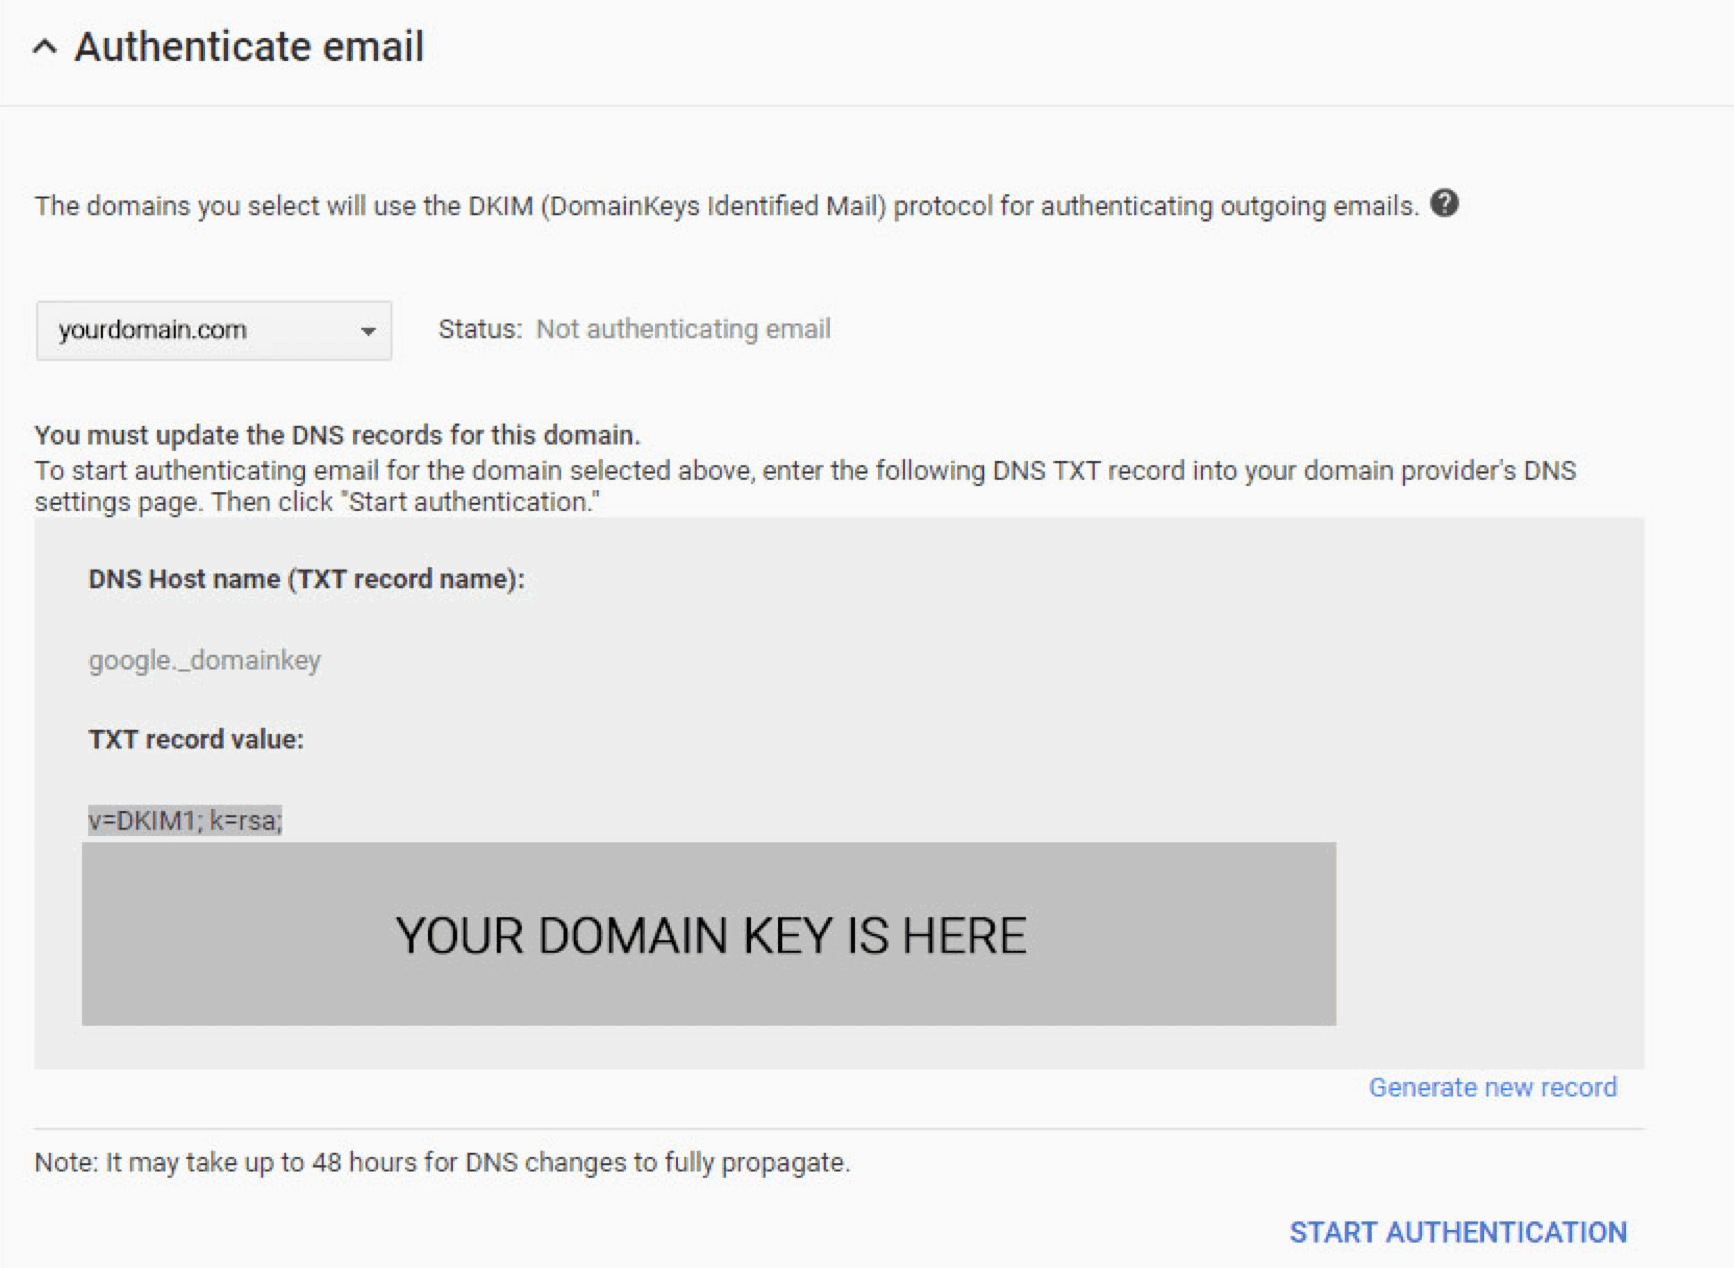
7. Add a new TXT record to your domain using your domain’s DNS manager. (the information for your TXT record will be provided on the screen after you click ‘Generate’ in step 6).
- Name (host or alias): google._domainkey
- Value (answer or destination): copy and paste the large block of text provided after you have generated the key (starting with v=DKIM1; k=rsa;)
- TTL: Enter 1800
- DNS records may take up to 48 hours to propagate fully
8. Click ‘Start Authentication’.
You can visit Google Help for more information about SPF and DKIM.
How to Setup DKIM for your Domain (Office365 with a custom domain)
If you use Office 365 without a custom domain, DKIM is already implemented by default, and there is nothing necessary for you to do at this point. If you use a custom domain with Office 365 and want to improve deliverability, implement DKIM with the following steps:
1. In the DNS manager for your domain, create two CNAME records.
Substitute your root domain name everywhere you see ‘yourdomain’. (ex: if your domain name is yourdomain.com, use yourdomain without ‘.com’.)
Record 1
- Name (host or alias): selector1._domainkey
- Points to (alias to): selector1-yourdomain-com._domainkey.yourdomain.onmocrosoft.com
- TTL: Enter 3600
Record 2
- Name (host or alias): selector2._domainkey
- Points to (alias to): selector2-yourdomain-com._domainkey.yourdomain.onmocrosoft.com
- TTL: Enter 3600
It may take up to 48 hours for DNS records to propagate fully
Enabling DKIM for your domain in the Office 365 Portal
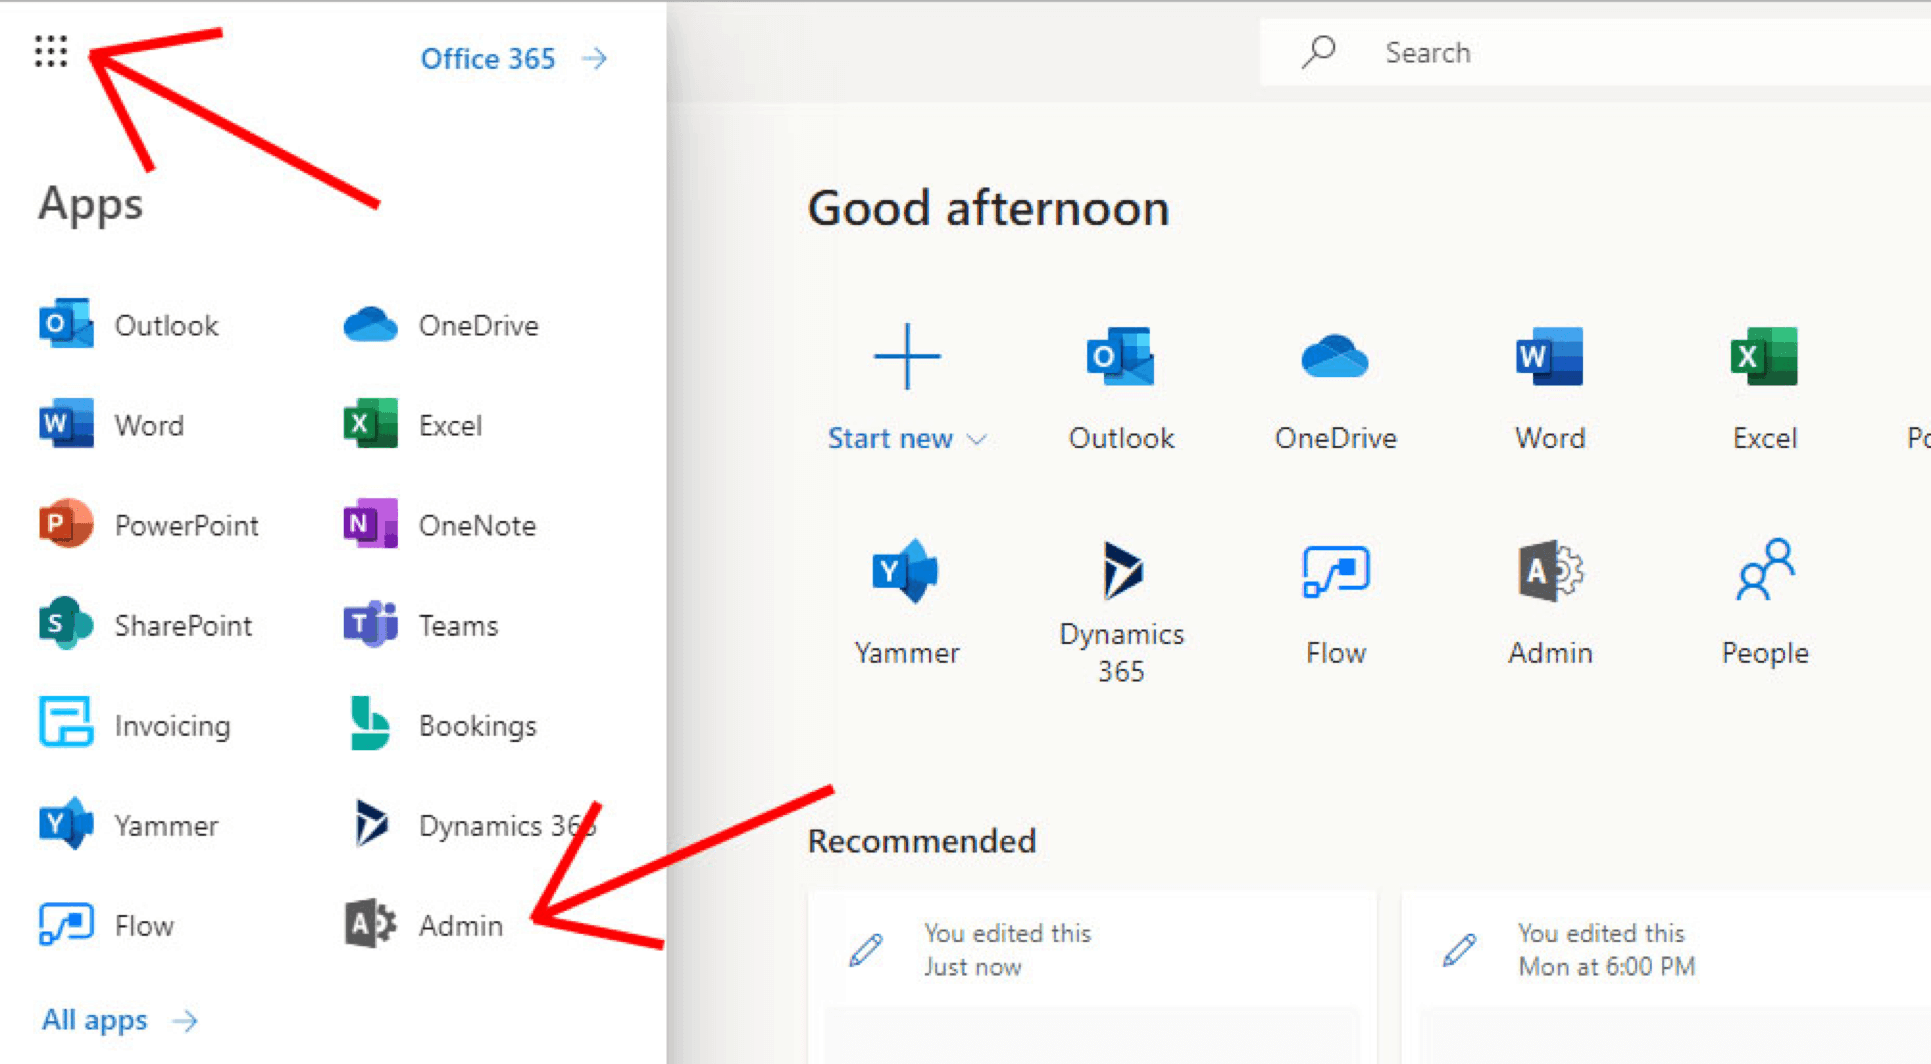
2. Login to the Office 365 portal at https://office.com/admin.
3. Click admin.
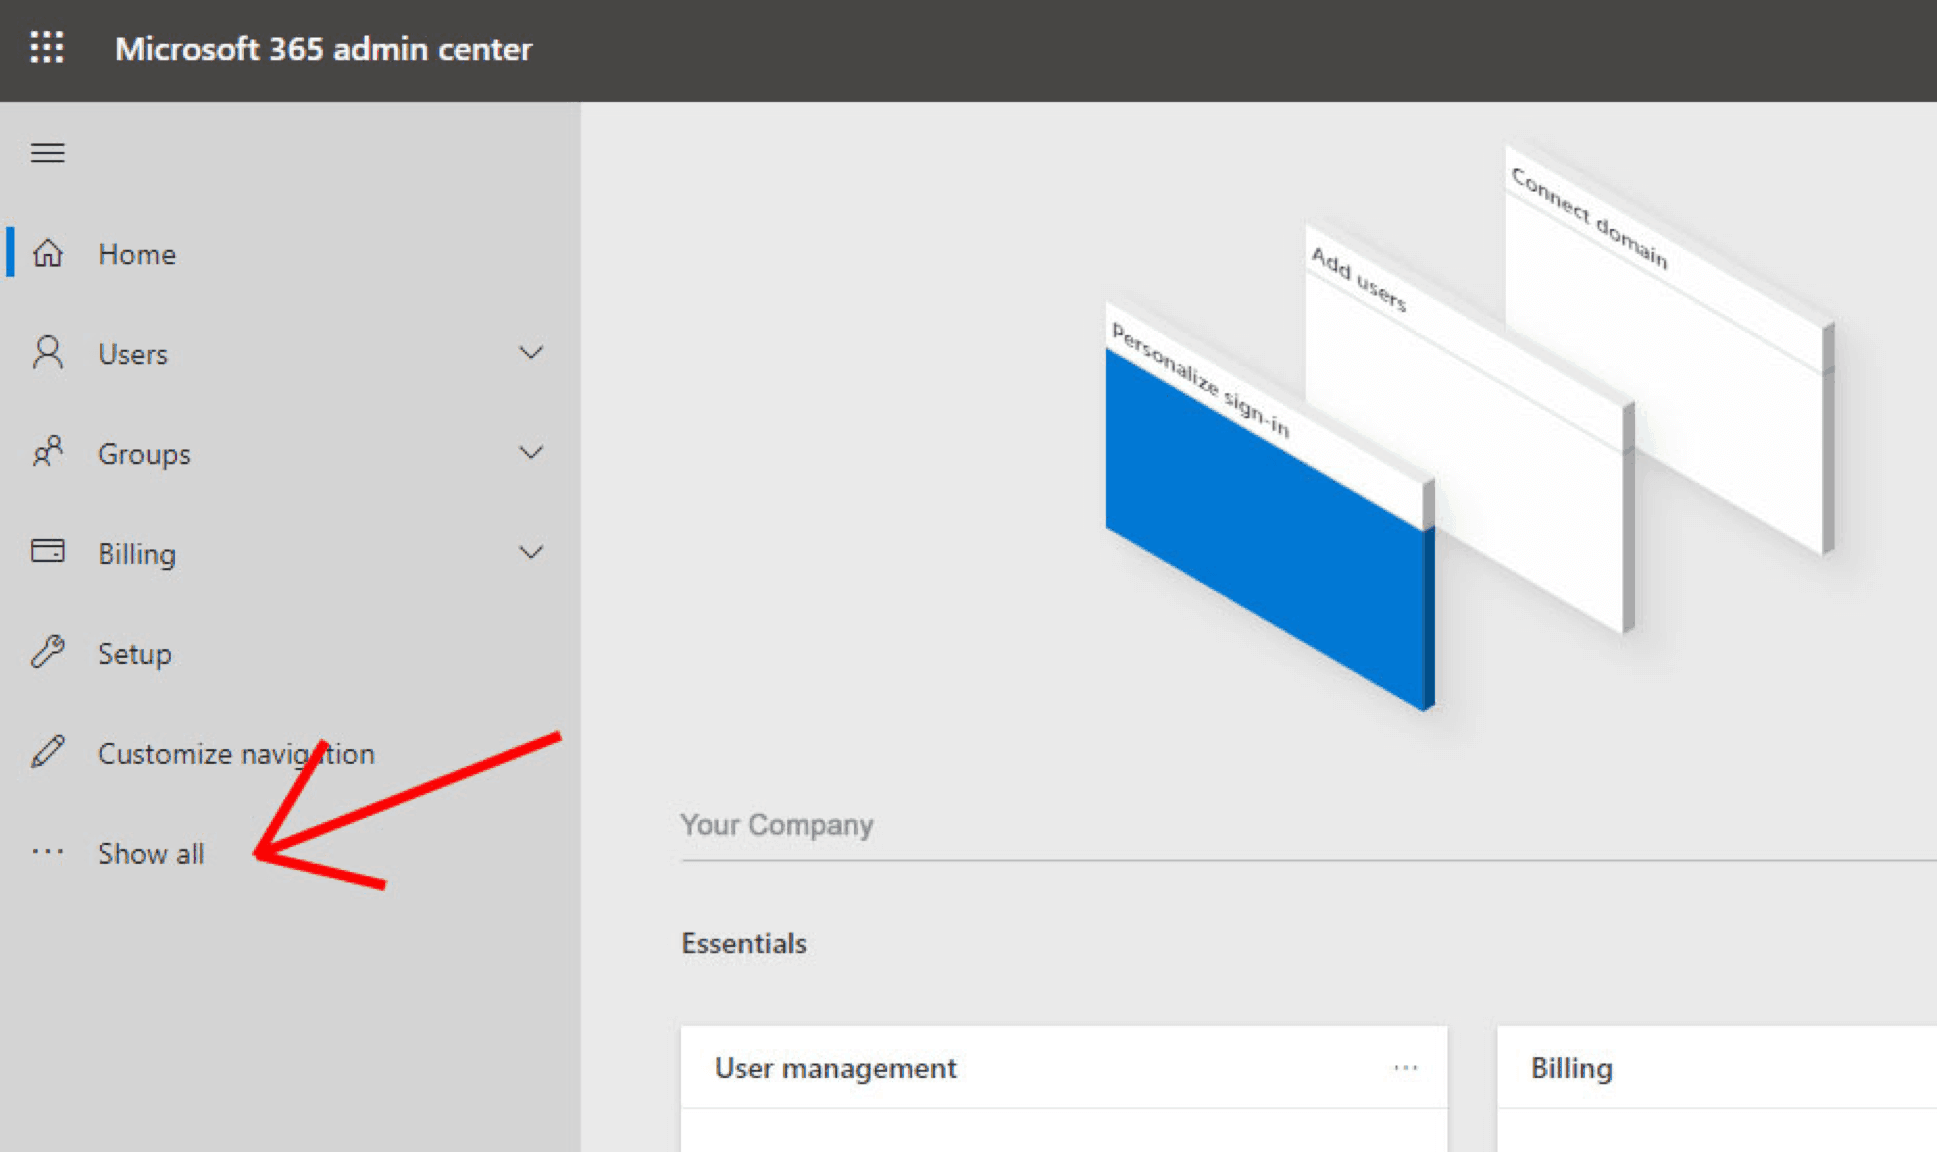
4. At the bottom-left side, expand the admin functions by clicking ‘Show all’.
5. Click ‘Exchange’.
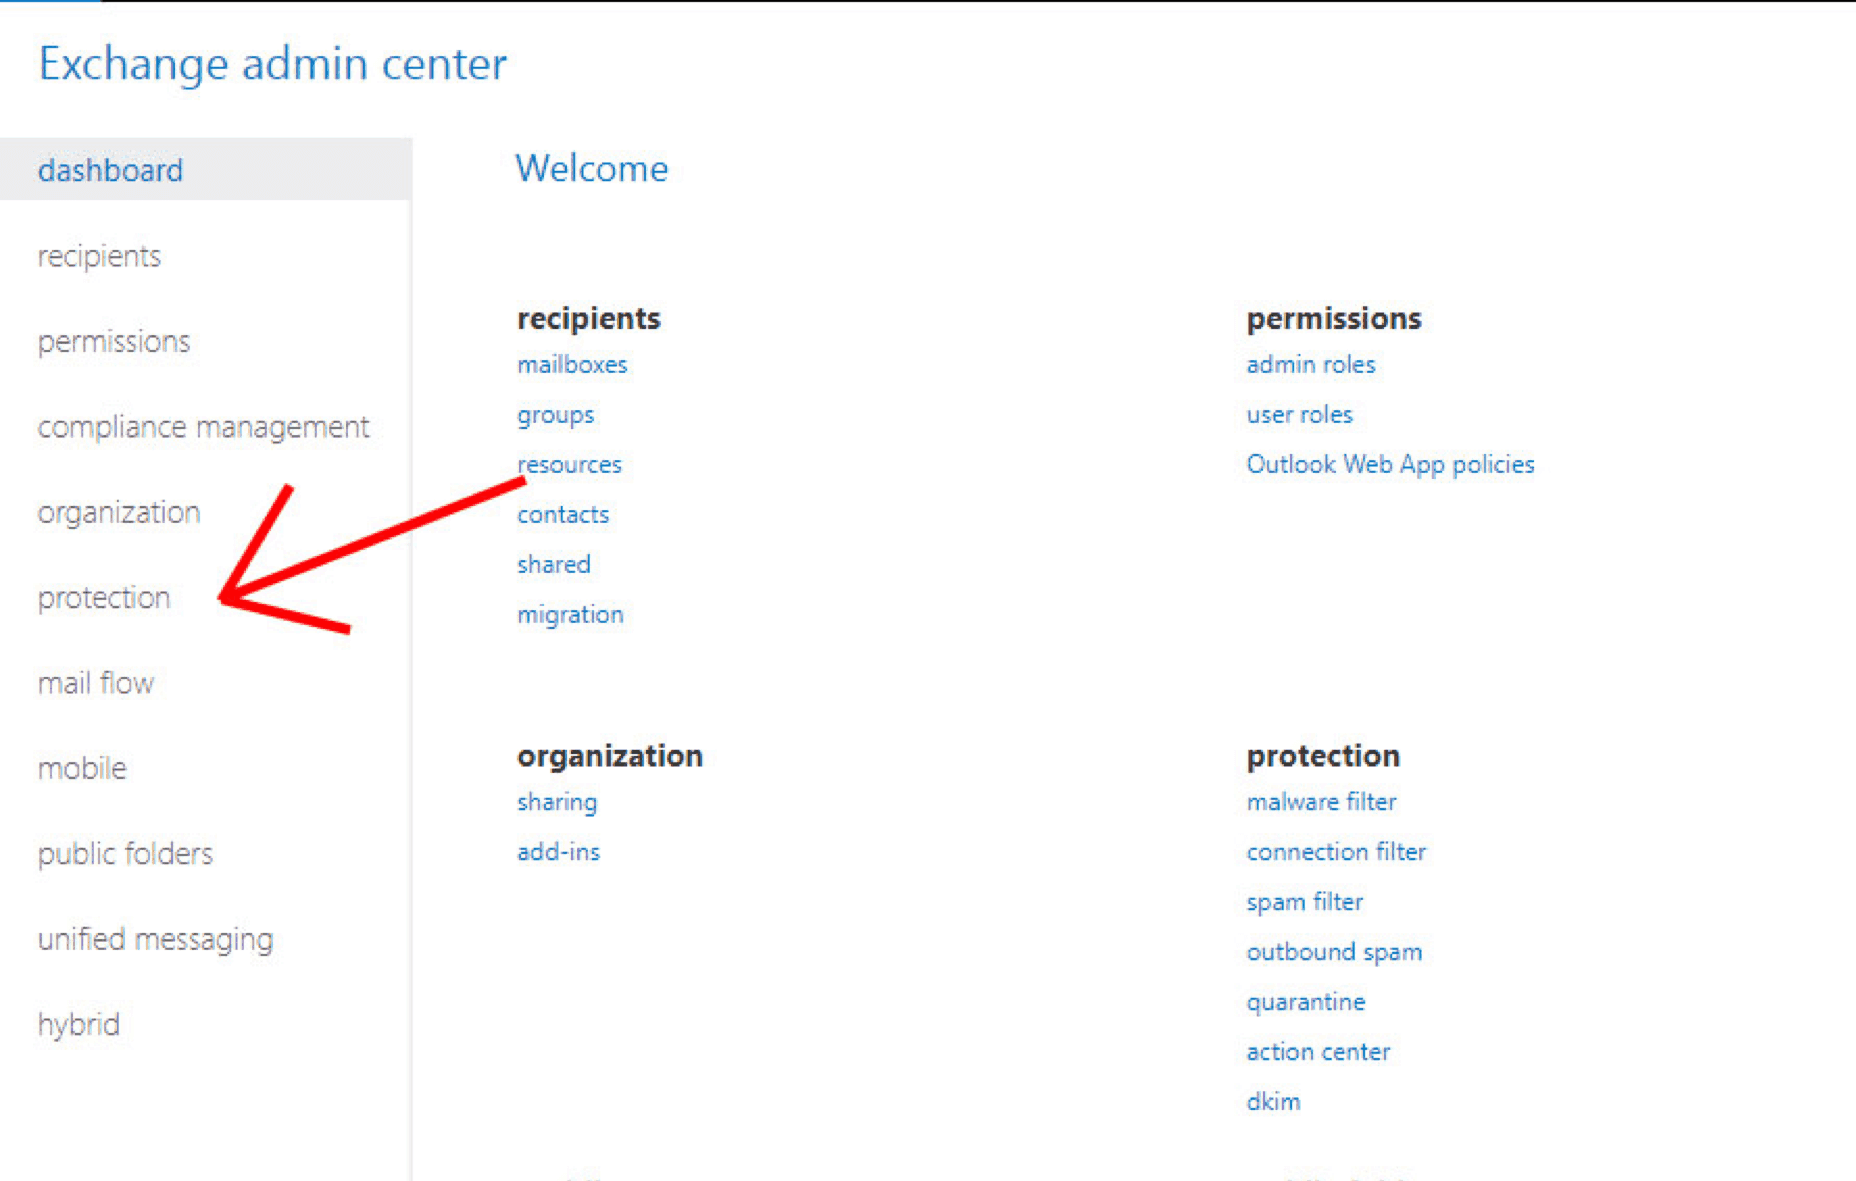
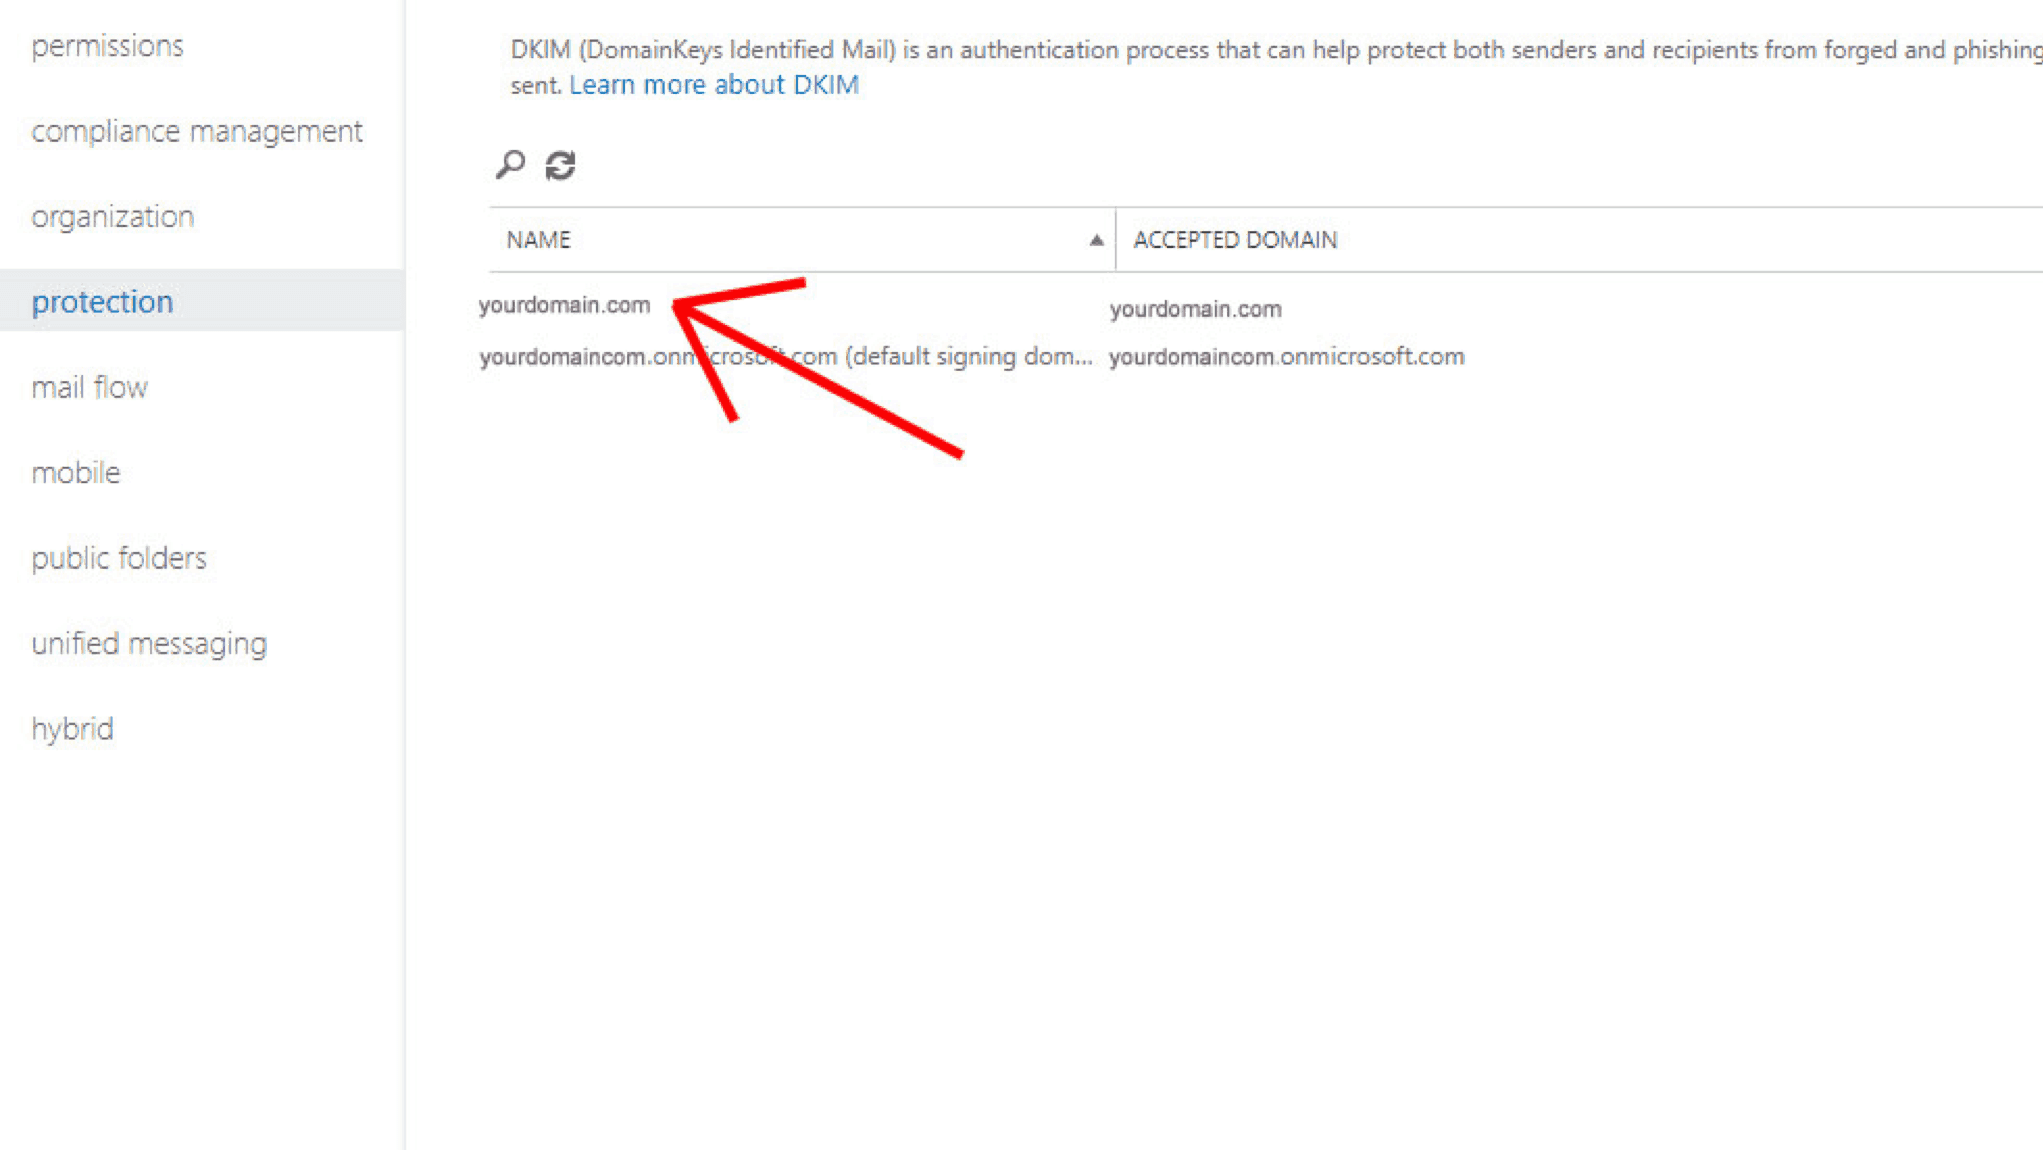
6. At the left, click ‘protection’.
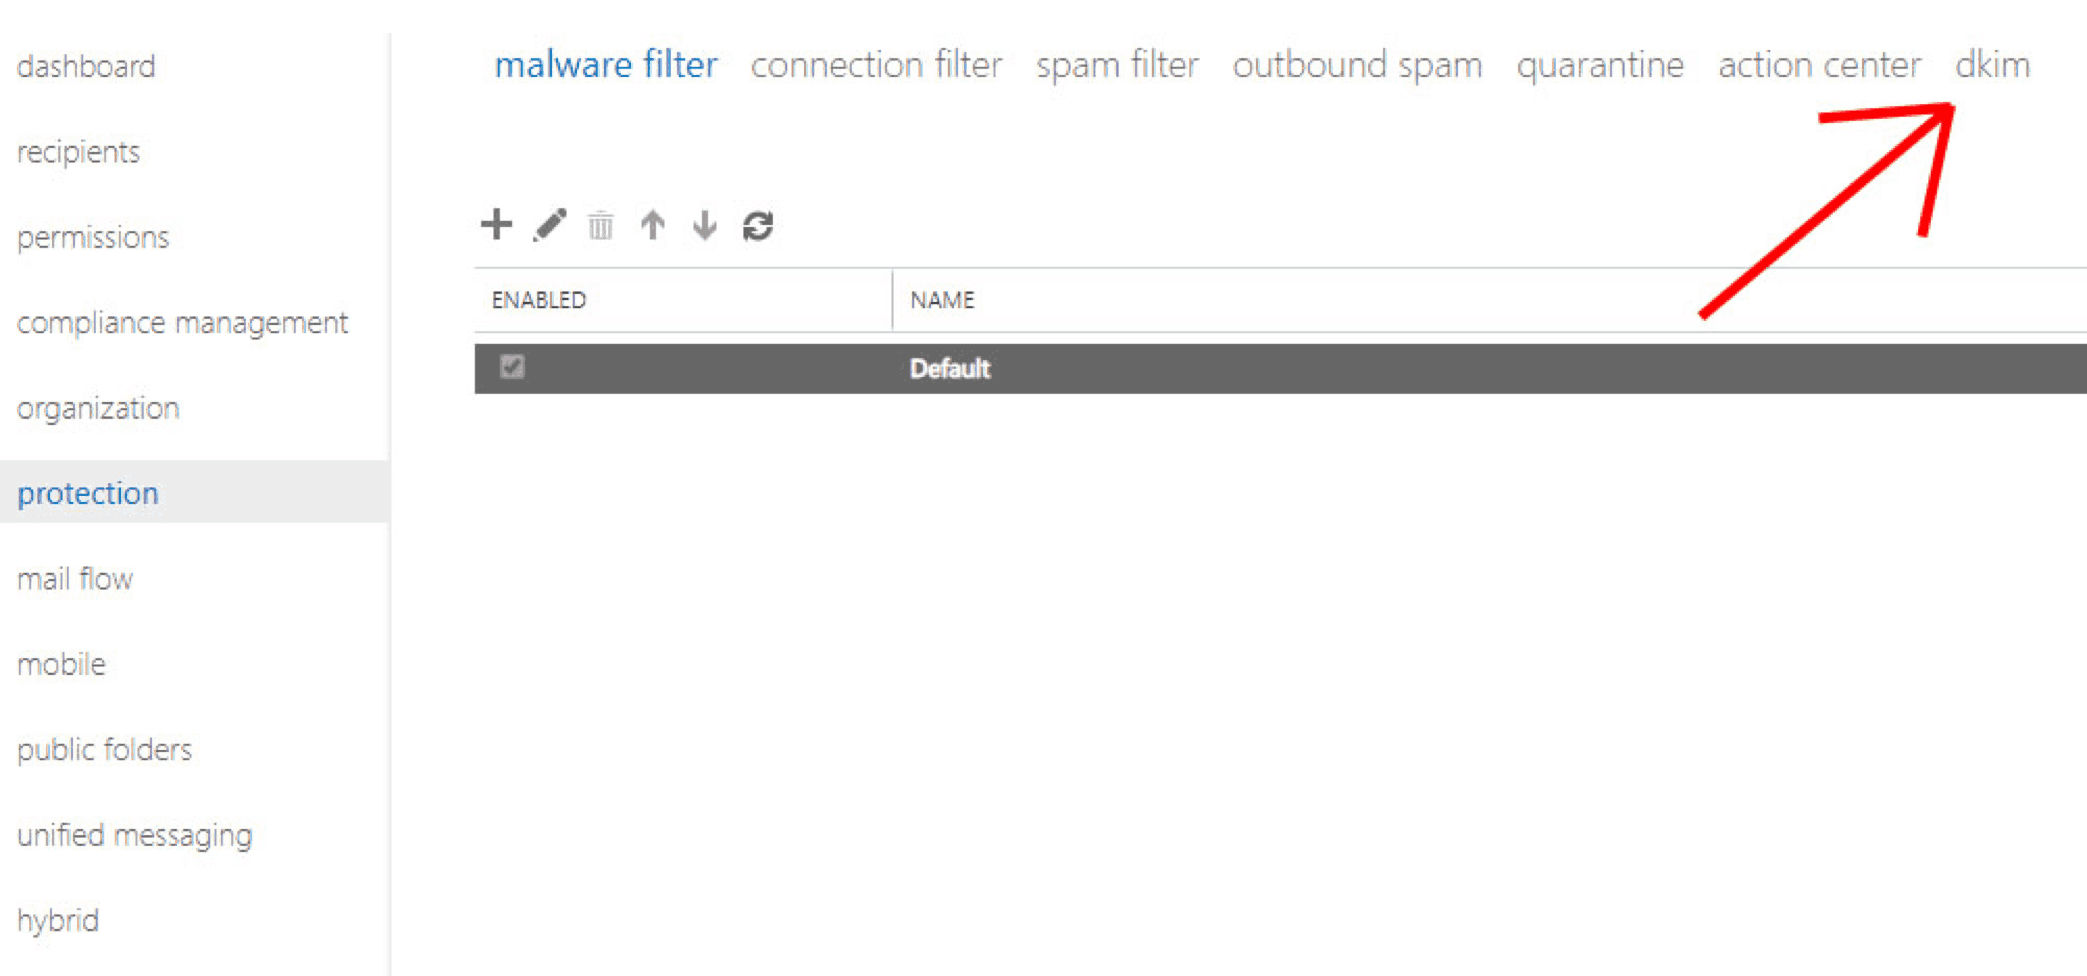
7. Click ‘dkim’ at the upper-right of the top menu.
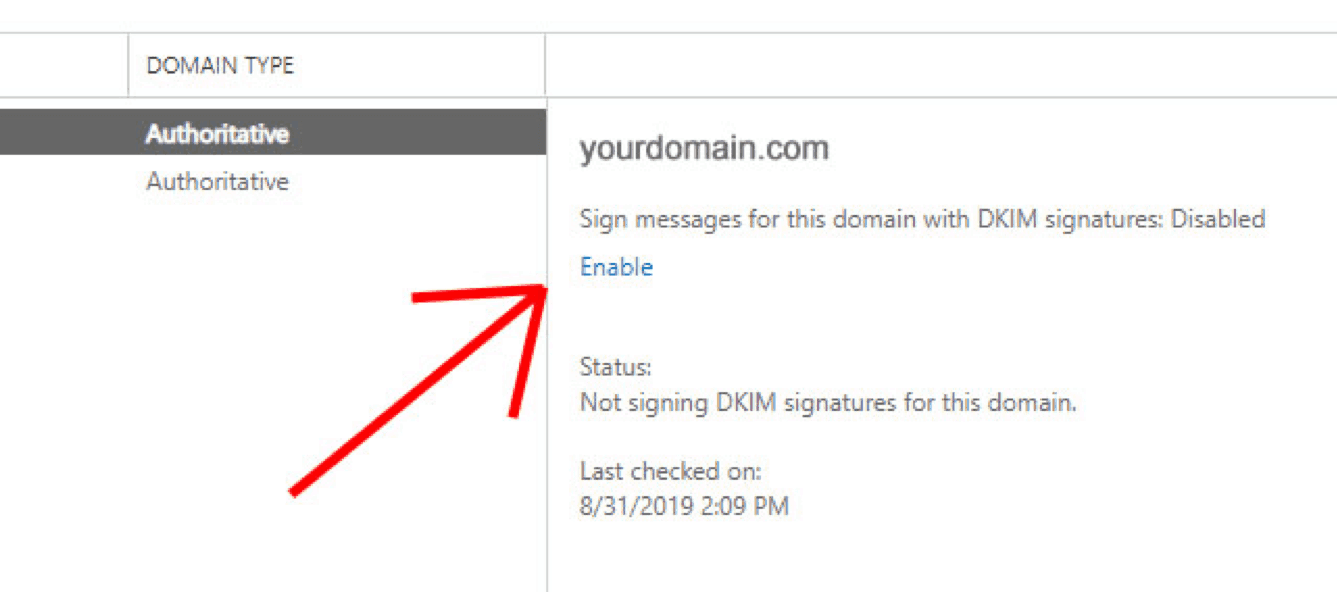
8. Click your domain and to the right, your domain information will show.
9. Click ‘Enable’ under ‘Sign messages for this domain with DKIM signatures…’.
10. DKIM is now enabled for your domain.
How To Enable DMARC for your domain (any mail system)
Note: DMARC implementation can have varied results and it is recommended that you start with a less restrictive setup, then fine-tune by forwarding more email to SPAM, etc. The following example shows three major levels of strictness, all sending reports to an email address for evaluation.
1. In the DNS manager for your domain, create a TXT record.
2. Set the following fields:
- Name (host or alias): _dmarc
- Time to Live (TTL): Leave at the default or enter 3600
- Value (answer or destination): Enter an example value based on your desired action (replace dmarc@yourdomain.com with a valid email address on your own domain name):
| Take no action on messages that fail the DAMRC Check | v=DMARC1; p=none; rua=mailto:dmarc@yourdomain.com |
| Send 5% of the messages failing DMARC check to SPAM (change % value to your liking) | v=DMARC1; p=quarantine; pct=5; rua=mailto:dmarc@ yourdomain.com |
| Reject all messages that fail DMARC check. (Example shows two email addresses) | v=DMARC1; p=reject; rua=mailto: dmarc1@yourdomain.com, mailto: dmarc2@yourdomain.com |
The art of personalization
I recently received a LinkedIn inmail from a recruiter. He said, based on my profile, that I’d be a great fit for a new position: a night-shift security guard.
My LinkedIn profile is 100% catered to marketing, copywriting, and freelancing. It’s something anyone who spends 5 seconds on my profile quickly identifies. The recruiter’s non-attempt at personalization was a total waste of time. There’s no way I’d respond to a message like that.
We’ve all experienced similar emails and DMs. When those lazy emails hit our inbox, we either roll our eyes or just get irritated. But we definitely don’t accept the proposition. We know their message was sent without care, which gives us zero reasons to care about their message.
Remember that next time you send a cold email. As a rule of thumb, consider your emails from the perspective of the recipient: if you’d laugh and click away from your own email, chances are your prospect will too.
3 Levels of personalization
Most of this post has covered the best practices for staying on the good side of email algorithms. But there’s another half to this battle. You also need to get email recipients to see value in your message. That comes down to personalization.
Guillaume says there are three levels of personalization people use in cold outreach. As a general rule, the more personal you can be, the better.
Level 1: The name 📇
If you’ve properly segmented the people you’ll be emailing, sometimes all you need is to properly spell the recipients’ name. Your offer or idea should, by itself, pique the interest of the recipient. All you have to do is send a kind, personalized greeting with your message.
Level 2: Company and industry 🏭
The second level of personalization basically involves stating the person’s first name, company name, and industry. These characteristics show a general familiarity with the email recipient. That person will see that you’ve done some homework and will be more likely to read the rest of your email.
Level 3: Gold standard 🥇
The third level is the gold standard. Guillaume says you can expect 3x – 4x replies at this stage. Level three involves playing on the recipient’s personal interests or showing an informed understanding of their career or business. Guillaume recommends using a relevant ice breaker — like how you know about them and their work.
He also suggests including a video or photo. Remember: You’re not trying to cold-pitch the recipient into a sale. You’re trying to invite them into a conversation and relationship. In that case, a short personalized video or photo can work magic.
The trick is to find ways to provide this level of personalization at scale. This involves creating relevant, highly-specific buyer personas and catering your email toward people who fit into that group. (See our previous post about creating powerful buyer personas.)
Test and iterate
Once you’ve followed all the steps in this article, it’s time to test and iterate. No matter how well you follow the best practices of email outreach, there’s always room to improve your email deliverability through testing.
If an email isn’t performing as well as you hoped, tweak the message or headline. Eventually, your emails may become as irresistible as tacos.
Another huge shoutout to Guillaume from Lemlist for providing such actionable advice. This email is part of a larger series he’s helping us create about email outreach. This article is the third in that series. Read the others:
What tactics do you use to get great deliverability?


