ShortPixel vs. TinyPNG: The Ultimate Speed Showdown
Know what sucks? A slow-loading website. Know what makes it even worse? When you know you’re losing organic traffic and conversions because site visitors get impatient.
Oh, and just to kick you while you’re down, Google penalizes you for having a slow website.
There’s no tortoise and hare moral of this story. A slow site undermines your search rankings and revenue because people click away from sites that don’t load (or aren’t well designed, tbh). Sound familiar, Internet Explorer?
One of the most common reasons a website might take forever to load: the owner is using enormous image files. In other words, they find an image online (or on their Nikon) and upload it straight to their blog or website. If that’s your client’s process, I’ve got two words for them: image compression.
Compressing images is super easy and can significantly improve the load speed of your site. If you haven’t gotten that far yet and you’re still debating whether to build your site on Squarespace or WordPress, we’ve broken down the differences here.
In this article, we’ll compare ShortPixel vs. TinyPNG, two popular tools/Wordpress plugins for compressing huge images into fast-loading, smaller (but still stellar) photos.
They make sites load faster, which makes Google happier, which makes customers more likely to buy.
So what are the differences between these two tools? Let’s find out!
[Want to test your page load speed? Try Google’s PageSpeed Insights or GTmetrix.]
ShortPixel vs. TinyPNG: My Experiment with Image Compression Tools
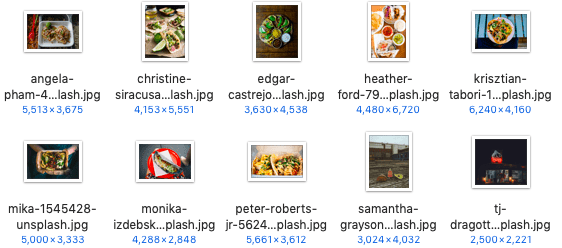
To kick off this tool comparison, I started with a really basic test: I downloaded ten high-quality, hunger-inducing taco photos from Unsplash and used the free versions of TinyPNG and ShortPixel to bulk-compress the JPEGs. Here are the images:
These ginormous files are probably the type of thing your clients just love putting all over their websites. Wait just one second, Deborah.
I dragged all ten photos into ShortPixel and TinyPNG’s online compression engines to compare the free functionalities of both. Here’s what I learned:
Speed
After uploading the 10 images, I timed how long it took both tools to compress the JPEGs. My results: TinyPNG took 1:49 minutes and ShortPixel took a bit less at 1:33 minutes.
File Size
This is when I bumped into the first free-version limitations.
ShortPixel’s free tool allowed me to compress files up to 10MB whereas TinyPNG only allowed me to compress files that are 5MBs or smaller. That means three of my Unsplash JPEGs were rejected outright by TinyPNG.
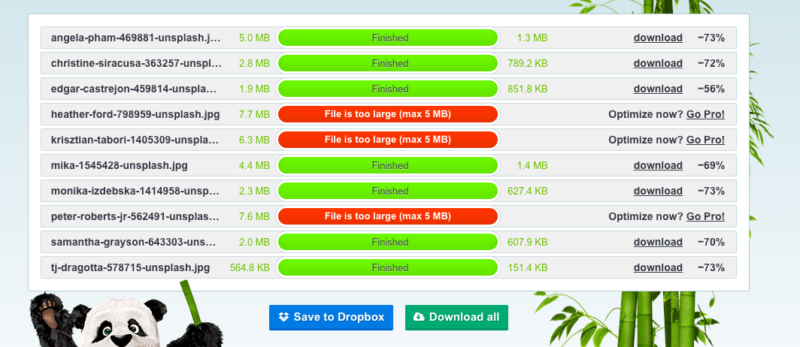
Kudos to TinyPNG for allowing users to save directly to Dropbox, which reflects a larger commitment to integrations overall. Also, you have to create a free ShortPixel account to download your images whereas TinyPNG just lets you hit “Download all” without giving away your deets.
Compression
For a JPEG compression, ShortPixel is also clearly the winner. ShortPixel’s compression rates were in the 71%-88% range, whereas TinyPNG compressed the JPEGs anywhere between 56%-73%. (Compare in the images above and below.)
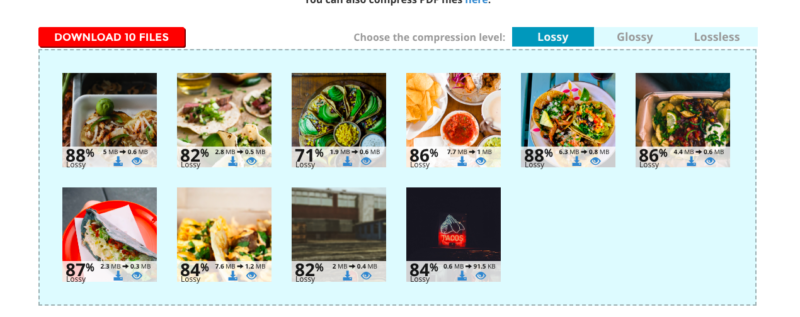
I also enjoy how ShortPixel showed me the images throughout the compression process and let me click the eye icon to view the image pre- and post-compression with a cool slider. Gotta keep an eye on those tacos, you know?
Comparing ShortPixel vs. TinyPNG image compression tools for developers and agencies
Compression options
ShortPixel has three compression options: lossless, glossy, and lossy. The optimization percentage varies a lot depending on the file type and, obviously, which compression format you choose.
TinyPNG, on the other hand, only offers lossy. TinyPNG says, “On average JPEG images are compressed by 40-60% and PNG images by 50-80% without visible loss in quality.”
Within WordPress, ShortPixel offers two plugins, ShortPixel Image Optimizer (SPIO) and ShortPixel Adaptive Images (SPAI). The default compression settings for SPIO is Lossy and for SPAI is Glossy. I know this is a little more technical, so get more details here.
What types of files can I compress?
With ShortPixel, you can compress JPEG, PNG, GIF, and PDF. TinyPNG lets you compress PNG and JPEG.
Tools/Plugins
Notably, TinyPNG has a Photoshop plugin for both Mac and Windows that allows you to scale images and save them in different sizes within Photoshop.
TinyPNG also has a lot of third-party plugins across various areas including content management, desktop, development, and eCommerce. “There are official add-ons available for WordPress, Magento 1 CE, Magento 1 EE and Magento 2 CE and official client libraries for Ruby, PHP, Node.js, Python, Java and .NET.” –TinyPNG site
ShortPixel offers Shopify image optimization as well as PHP-generic image optimization. View their API tools including a Zapier integration for compression in Google Drive and Dropbox. Many people feel a lot better about using a public WP plugin if they know the developer, so you may want to check that out.
ShortPixel is currently expanding into the dedicated optimization servers market and adding more WP plugins. They currently have five including the two mentioned plus Enable Media Replace, reGenerate Thumbnails Advanced, and Resize Image After Upload. You can view ShortPixel’s third-party compatible WordPress services here.
WordPress Plugins
Both ShortPixel and TinyPNG WordPress plugins offer bulk optimization, thumbnail optimization, and CMYK to RGB conversion, which means you can compress and optimize your clients’ old blog photos in minutes. They are both compatible with most galleries used in WP today.
With ShortPixel, you can use one of two main WordPress plugins, Image Optimizer WordPress Plugin (SPIO) or the newer ShortPixel Adaptive Images Plugin (SPAI).
Once installed, SPIO can compress all the images on your site and replace them exactly where they were, optimizing your entire site fast. It also gives you the option to automatically convert PNG to JPG if it will render a smaller image. Compared to TinyPNG, this plugin allows you decide which type of compression you want (choose between lossy or lossless).
The next step up is ShortPixel’s newer plugin SPAI, or image processing on-the-fly which optimizes, sizes, and crops all your website’s images, serving them from ShortPixel’s global CDN. The ShortPixel AI determines what device a user is on so it predictively serves the right-sized images (while it also allows for lazy load support—meaning further speed gains).
On the other hand, TinyPNG’s WP plugin lets you automatically resize PNG and JPEG uploads by setting a max. width and/or height. It is also WooCommerce compatible. They also have a WordPress app for image optimization on mobile.
Costs
When you’re comparing ShortPixel vs. TinyPNG in terms of price, there’s a bit of a challenge because they offer different pricing structures. Depending on your monthly image needs, either tool might be cheaper than the other.
In the standard free version, ShortPixel lets you compress up to 100 images per month. TinyPNG lets you compress up to 500 within their free version. However, once you’ve transitioned from free to paid on both apps, TinyPNG’s prices climb much, much faster than ShortPixel.
To compress 4,500 images per month on ShortPixel is $4.99. To compress the same number of images on TinyPNG is $36. (There goes all my TacoDeli money.)
Where do the tools flip? If you’re compressing fewer than 1,000 images per month, TinyPNG is slightly cheaper. If you’re compressing more than 1,000 images per month, ShortPixel is vastly cheaper.
And for Sumo-lings, ShortPixel is cheaper no matter what.
API details/limits
If you’re a developer or website builder, connecting your server to an API that compresses your images may be the real use case you’re looking for. Both TinyPNG and ShortPixel have developer APIs. Both charge per compression.
TinyPNG’s API has some cool features including image resizing, area of interest detection, and cutout detection. ShortPixel’s SPIO doesn’t touch the images so the API doesn’t have something like this. But SPAI actually changes the images with automatic “area of interest” detection as mentioned above. Learn more about SPAI’s API parameters.
—
Huge shoutout to Rick B. for this awesome comparison article suggestion. Which tools would you like us to compare next? Tell us in the comments!
 Source